
How to Make Polymer Clay Anemone Flowers | Step-by-Step Tutorial with Video
Polymer clay anemones are bold, dimensional flowers that make stunning statement earrings and brooches. This tutorial walks you through the entire process, from creating the textured flower center and stamens, to shaping thin, realistic petals, and finishing with leaves and findings.
👉 The video goes it to much more detail than the tutorial alone. Jump to the full video tutorial here.
Whether you use the 3 cm cutter set for smaller blooms or the 4 cm cutter set for larger statement flowers, you’ll be able to create professional-looking anemone designs with ease.
Tools and Materials
- Anemone Cutter Set (3 cm or 4 cm options)
- Polymer clay
- Pasta machine or thickness guides (for rolling clay thin and even)
- Ball tools (for thinning and texturing petals)
- Tissue blade (for clean cuts and trimming bases)
- Scissors (pointed tip, for cutting fringe on stamens)
- Petal pad or foam mat (to support petal shaping)
- Optional tools: zester (for speckled clay texture), knurled tool for adding bumps in the center
- Oven-Bake Adhesive (for securing layers or findings between bakes)
- French hook or other earring findings
- Cornstarch (to prevent clay from sticking to ball tools while shaping)
Making the Flower Center
Form a Cone: Roll a small piece of clay (black is traditional for anemones, but you can use any color) into a short, rounded cone. Use the circular hole in the rectangle-shaped cutter as a sizing guide. The cone should be close to the circle in size without poking too far through, and the cone should be shaped with a softly rounded tip rather than a sharp point.
Texture the Tip: Use a knurled tool, textured handle, or similar tool to gently roll across the top and sides. This creates the subtle, bumpy surface that mimics the mound of tightly packed pistils at the very center of an anemone flower.
Creating the Stamens
Make a Thin Slab (Speckled or Plain): Roll out a very thin slab of clay, about 0.7 mm thick. For a speckled effect, grate together two colors (for example, black and purple) using a zester, then press and roll until blended into a thin slab.
Cut with the Rectangle Cutter: Use the stamen rectangle cutter, which leaves dotted guides across the clay. These impressions will help mark where to cut the fringe.
Cut Fringe: Hold the rectangle in your hand and use sharp scissors to snip in from the edge toward each dot, creating a fine stamen fringe. The guides help with spacing, but precision isn’t critical.
Wrap Around Cone: Attach the fringe strip to the cone with the fringe facing upward, wrapping it around two to three times. For a fuller center, repeat with a second strip.
Shaping the Petals
Roll Clay Thin: Roll clay to about 1 mm thick (Marcato Atlas pasta machine setting #7).
Cut Petals: Use all three petal sizes, cutting 5–10 of each for one flower.
Move to Foam Pad: Use a tissue blade to carefully transfer petals to a foam pad or petal pad.
Thin the Edges: With a larger ball tool, work around the edge of each petal to thin it by about half, giving a natural, organic look.
Add Texture: Switch to a smaller ball tool and press outward from the center in gentle curved lines. This creates subtle veining and a cupped, “taco”-like shape.
Tip: Dust tools with cornstarch to prevent sticking while shaping.
Applying the Petals
Start Small: Attach five of the smallest petals around the stamen cone. Overlap some slightly for a natural look.
Add Medium Petals: Place five medium petals in the gaps between the first layer. Offset them rather than centering exactly, for a more organic arrangement.
Add Largest Petals: Apply one or two layers of the largest petals (5–10 total). This brings the flower to about 15–20 petals overall.
Check Symmetry: View from the top and side as you go to keep the flower balanced but not identical. Remember that some variation makes the flower more lifelike.
Reducing and Baking
Press Base Together: Use a tool to compress the underside of the flower, reducing the trunk so it hides beneath the petals and bonds securely.
Trim Flat: Slice across the base with a tissue blade to create a flat surface. Make sure petals are pressed firmly together above the cut so none loosen after trimming.
Bake Option: Place on a tile and bake according to clay instructions (Scarlet bakes for a full hour). If petals risk falling during baking, support them with batting, wood, or metal props.
Tip: You can attach leaves at this stage if you prefer, but pre-baking the flower first makes handling easier.
Cutting and Adding Leaves
Thin Leaf Option (1.5 mm): Roll clay to 1.5 mm thick (Atlas #5) and use the detailed debossing cutter as a cutter. This cutter was designed for thinner clay so the leaves won’t add bulk.
Thicker Leaf Option: For thicker clay, press the debossing cutter lightly as a stamp to create the vein texture. Do not press the detailed debossing cutter all the way to the cutting surface when working with clay thicker than 1.5 mm. Clay will become jammed in the cutter. Once you press the cutter gently into the clay as a stamp, lift it, and then cut out the leaf using the separate outline leaf cutter.
Build Base: Use one or two leaves, overlapping for interest. Optionally, cut a thin duplicate leaf and sandwich your earring finding inside for extra security.
Attach Flower: Position the cured or uncured anemone on your leaves. If combining cured and uncured clay, use oven-bake adhesive for a stronger bond.
Bake: Cure fully to set both flower and leaves.
Final Thoughts
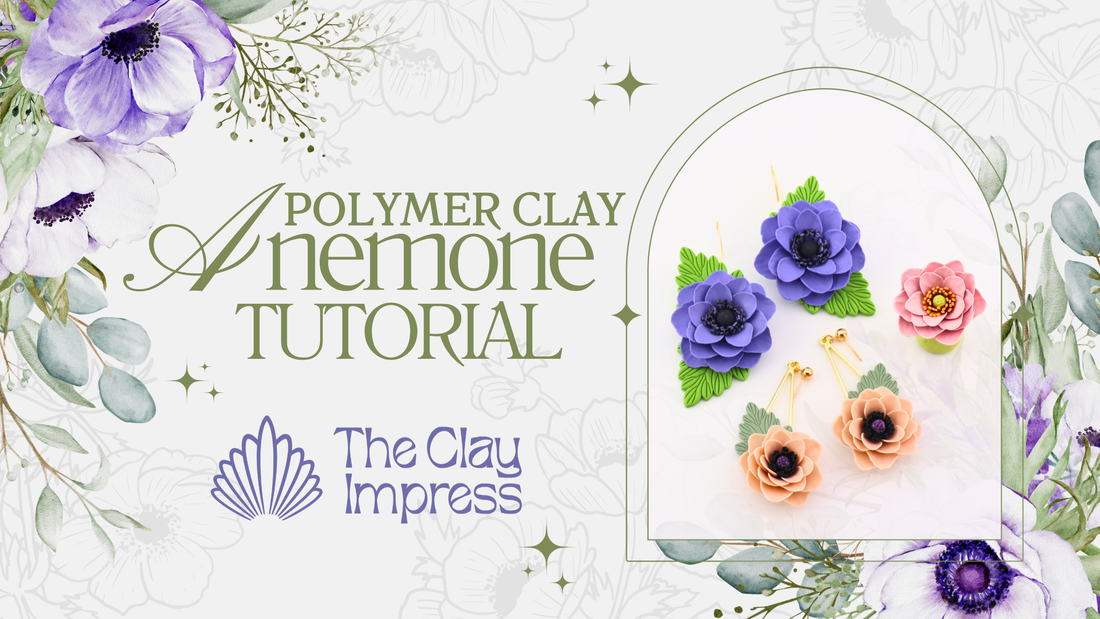
Your finished polymer clay anemone earrings will look bold and dimensional, with a textured stamen center and layers of lifelike petals. The design can be made in either 3 cm or 4 cm sizes depending on whether you prefer smaller or larger statement pieces.
Experiment with petal colors and center textures: purple with black centers is a classic choice, but white, blush pink, or deep jewel tones also create stunning results.