
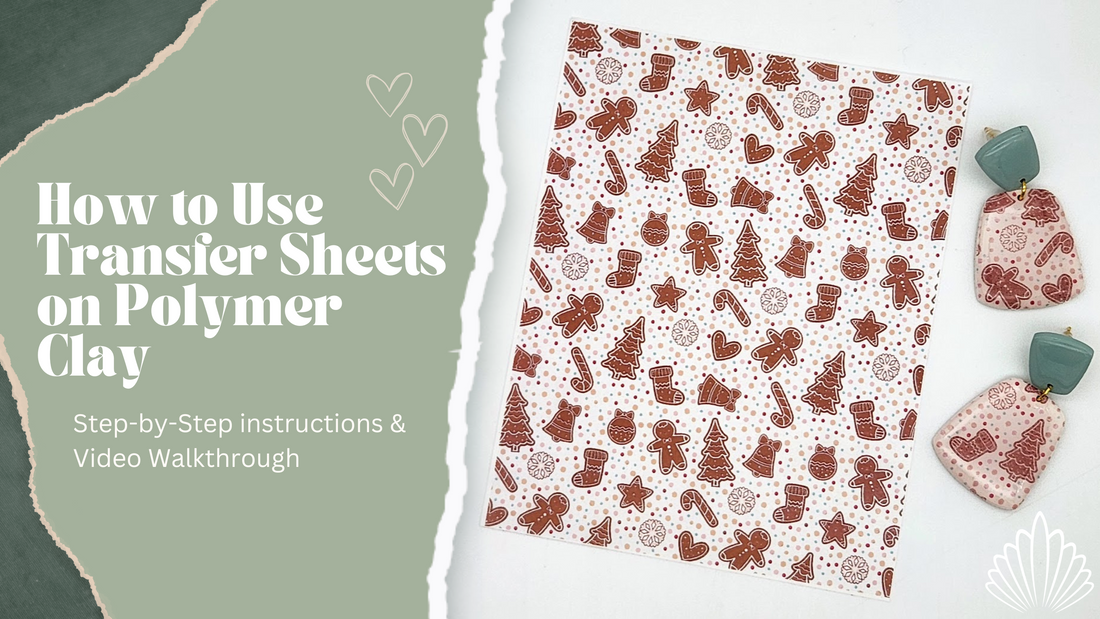
Using Water-Soluble Transfer Sheets for Polymer Clay: Step-by-Step Guide
Polymer clay crafting is all about imagination and creativity, and one way to elevate your projects is by using water-soluble transfer sheets. These versatile sheets allow you to add intricate designs to your clay creations with ease. In this tutorial, we'll take you through the step-by-step process of using water-soluble transfer sheets on polymer clay. We'll also share some valuable tips to ensure your designs turn out beautifully. In addition to our detailed written instructions, we've prepared a helpful video tutorial at the end of this guide, allowing you to see the process in action – scroll to the bottom to find it.
Materials You'll Need:
- Water-Soluble Transfer Sheets
- Polymer Clay (white or light-colored)
- Acrylic Clay Roller or Clay Machine
- Smooth Work Surface
- Cool Water Source
- Cornstarch (optional)
- Sealant (optional)
Step 1: Prepare Your Clay
Begin by rolling out a slab of white or light-colored polymer clay on a clean, smooth work surface. White clay works exceptionally well as the base color will show through the transferred pattern. Make sure the clay is sticky and well-conditioned for the best results. Avoid using Sculpey Soufflé, as it has lower stickiness, making it less ideal for this technique.
Step 2: Apply the Transfer Sheet
Now, take your water-soluble transfer sheet and place it face down onto the prepared clay slab. Gently rub the sheet to ensure it adheres securely to the clay. This step is crucial for a clean and detailed transfer.
Step 3: Rinse Away the Paper
In a sink or under a gentle stream of cool water, rinse away the water-soluble paper. Do not use your fingers or any tools to remove the paper backing at this stage. Some paper may remain, but don't worry; you can address this later after baking.
Please note that some ink colors (typically darker colors) will hold onto the paper more than others. For these patterns, it is better to sprinkle a bit of water on the transfer and let it soak for 15 minutes or so. This will help the paper come away from the clay when rinsed away. After letting it soak, the moist paper may be rinsed away.
Step 4: Let It Air Dry
Place your clay slab with the transferred design in a safe, undisturbed location and allow it to air dry. Do not touch, pat, or use anything to soak up the water during this stage, as any contact with the transfer could potentially ruin it.
Step 5: Handle with Care
The ink on the transfer may smudge easily until it's baked, so it's best to avoid touching the transferred image if possible. For added protection, you can optionally dust the design with cornstarch before cutting shapes and baking.
Step 6: Cut and Bake
Once your clay is dry, cut out your desired shapes. Follow the baking guidelines provided on the polymer clay packaging to ensure your creations are perfectly cured.
Step 7: Address Any Remaining Paper
After baking, you may notice some bits of paper adhered to the pattern. Simply rinse and gently rub the design to remove any lingering paper remnants.
Step 8: Seal for Durability
The transfer will appear matte and durable on your clay creation. For added protection, consider sealing it with your preferred sealant. This step is optional but will enhance the longevity of your design.
Store any unused transfer sheets in a dry area. Any moisture, even from the air, may break down the water-soluble paper, making the transfer not work as well.
With these steps and a little creativity, you can take your polymer clay projects to the next level using water-soluble transfer sheets. Experiment with different patterns and techniques to craft unique and beautiful designs. Enjoy your creative journey!
Don't miss our video tutorial, which provides a visual walkthrough of the entire process, ensuring you achieve the best results.
Troubleshooting Tips
Even with careful preparation, you may encounter a few common challenges when working with water-soluble transfer sheets on polymer clay. Here are some troubleshooting tips to help you achieve the best results:
Issue: Paper Fibers Remain on the Pattern After Rinsing (Especially with Darker Colors)
Solution: Darker ink colors are more likely to hold onto paper fibers. If you notice visible fibers on your transferred design after rinsing:
- Mist the surface with water and let it soak for about 10 minutes.
- After soaking, gently rinse again. This should help remove more of the fibers.
- Some fibers may still remain, but these can be carefully rubbed off after baking without damaging the pattern.
Issue: Pattern Is Not Sticking Well to the Clay
Solution: If the pattern doesn’t seem to be adhering properly:
- Ensure your clay is well-conditioned and slightly sticky. Avoid using Sculpey Soufflé, which has lower stickiness.
- Press and rub the transfer sheet firmly onto the clay surface, ensuring full contact.
- For extra adhesion, rub the transfer sheet onto the clay and let it sit for about 10 minutes before rinsing.
Issue: Ink Smudges Easily Before Baking
Solution: The ink can be fragile until the clay is baked. To protect the design:
- Allow the transfer to air dry completely before handling. Do not wipe dry.
- Lightly dust the surface with cornstarch before cutting and baking.
Issue: Some Paper Remains After Baking
Solution: If you still see bits of paper after baking:
- Re-wet the design and gently rub away any remaining fibers.
- For stubborn fibers, soak the piece for a few minutes, then gently rub again. This should clean up the surface without damaging the pattern.
Issue: Transfer Paper Breaks Down Before Use
Solution: Store unused transfer sheets in a dry area. Even humidity from the air can cause the sheets to begin breaking down, which may prevent the transfer from working properly.